Last Updated: 06-09-2020
What you'll build
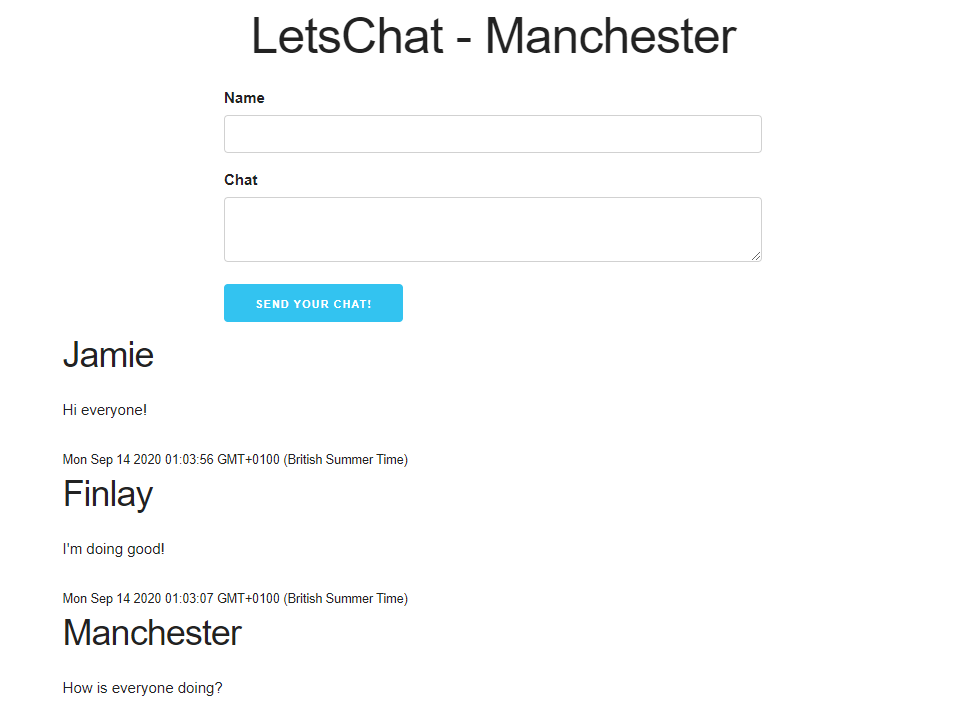
In this codelab, you're going to build an anonymous messaging board. Your app will:
- Allow users to post a message on a page which everyone else can see.
- Automatically refresh others messages when you post one.
- Save all messages so that they are persistent across sessions.
What you'll learn
- How to create a web app which makes calls to an API.
- Host an API which has both post and get routes.
- Connect a backend API which you create to a cloud hosted database (MongoDB Atlas)
- How to host the whole product on a web server.
Hopefully by the end of the project you will be able to take what you have learned to build a more advanced web app and win some hackathons!
What you'll need
- Some basic knowledge of HTML, CSS, JavaScript, Node.js.
- An up to date browser (We will be using chrome but its up to you)
- Node.js and NPM package manager which can be downloaded from here: https://nodejs.org/en/
- MongoDB:
- Download the community server from here: https://www.mongodb.com/try/download/community
- Then follow these install instructions: https://docs.mongodb.com/guides/server/install/
- A text editor
- Git (optional)
Support
- Get tech support in our discord server: https://discord.gg/brQMHdk
- At each step of the project there is a branch on git with the completed code: https://github.com/DSC-UOM/Intro-to-hackathons/branches/active
What is a web application?
We are going to start at the foundation and quickly build up to a full web application. First things first, what is a web app?
A web app is a piece of software which is run on a web server rather than being installed on the that you are currently using. It uses a web browser to request data from a server and then executes any code and displays it within the browser.
How are they built?
Web apps can be broken down into 2 main sections. The first is the front end of the application, this is the code and content that creates what the user will see when they access the site. The second is the backend which contains the logic and the data which the application runs on. This can be broken down further to the application and storage. The application is generally written in any common programming language (Python, Java, Node.js). The storage consists of a database (MongoDB, MySQL, PostgreSQL).
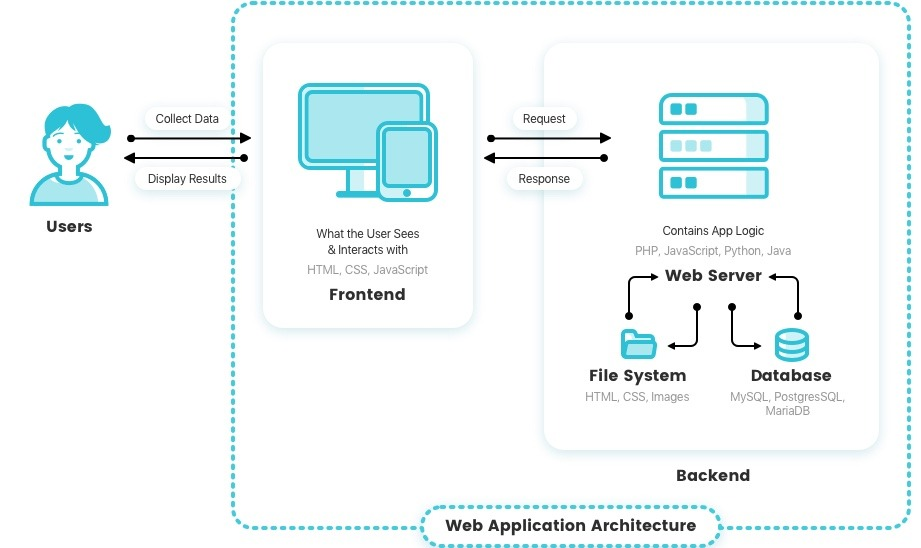
The diagram illustrates the user interacting with the front end and then the front end fetching data to display front the backend web server.
Our architecture
So what are we going to use for our frontend, backend application and database? There are many options and there is no correct answer as each different language and database has pros and cons and it completely depends on what you are building. For ours we have gone for things that are the easiest to understand and build with.
 The frontend: Vanilla JavaScript
There are many options for the front end and more being created every month. All frontends will run on JavaScript as it is the language that all common browsers can understand and run. You may also hear about JavaScript frameworks such as Angular, React and Vue. These are all still JavaScript but make development easier to manage when you have larger applications. They are quite complex, so we won't be covering them in this code lab, but they we will be running a series on building a portfolio website using angular in the future so look out for that!
 The backend: Node.js
Again the options for building a backend server are very broad, there is even more than for the front end! Node.js is unique because it uses the same syntax as javascript so you can write both the front end and backend in the same language! This makes it very popular in developing web apps and its extensive library of packages (more on those later) makes complex problems very easy to solve.
 The database: MongoDB
MongoDB is document database, which means instead of storing data in traditional relational tables it stores them in JSON-like documents. The object based features makes it very useful in web development as you can pass data as objects and very easily use it. Also, its cloud features such as MongoDB Atlas will make it easy for us to host it on the web later on!
Make sure the environment is set up!
Before we start we need to make sure that all your software is set up to run our application. We can run some commands to make sure its all working.
Create a folder and initial file
First we need to create a folder the project itself and to get started we are going to set up a client folder and an index.html file.
You can get this structure plus all the resources you need for this project from our GitHub:
If you are creating it yourself then the folder structure should look like this:
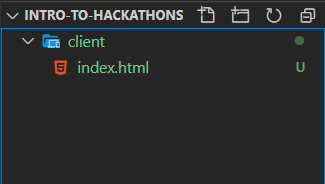
Node, NPM & MongoDB
We need to validate that you have correctly installed node and NPM. Don't worry if your versions don't match with these as long as you can run these command you should be fine!
Intro-to-hackathons> node --version
V12.18.3
Intro-to-hackathons> npm --version
6.14.6
Initial HTML File
Let's start simple and create a page for our app! If you cloned the git repository you will already have this code, if not then you can copy and paste it or type it out and change it however you like!
index.html
<!DOCTYPE html>
<html lang="en">
<head>
    <meta charset="UTF-8">
    <meta name="viewport" content="width=device-width, initial-scale=1.0">
    <title> LetsChat - Manchester </title>
</head>
<body>
    <header>
        <h1> LetsChat - Manchester </h1>
    </header>
</body>
</html>
Install and run live-server
Now that you have NPM installed you can use its packages for some really cool things, such as hosting your site locally which we are going to do now with live-server!
First lets install live-server. We are going to install it globally so use the -g flag.
Intro-to-hackathons> npm install -g live-server
Hopefully you should see a bunch of installs which end in something similar to this.
+ live-server@1.2.1
added 194 packages from 149 contributors in 10.35s
We are now going to use live server to start out our application! Move into the client folder and run.
Intro-to-hackathons\client> live-server
This should open your browser window on the address: http://127.0.0.1:8080/

We are all set up!
What we've covered
- Install and validate Node, NPM and MongoDB
- Use NPM to install a package
- Host a webpage on your local machine
Let's make the client look a little better!
What you'll learn
- How to import CSS framework and use it.
- How to create a HTML form.
- How to connect the form to JavaScript.
Import and use a CSS framework
A CSS framework predefines some CSS which you can then use in an application. It is a great way to quickly get started and standardise the look of your website. Our app is going to be very basic, so we are going to use a very simple and lightweight Framwork called Skeleton CSS. This framework adds less code than some more common libraries such as bootstrap due to it removing some of the more complex features.
Adding a CSS framework is super simple you can add one line of code!
index.html
<head>
    <meta charset="UTF-8">
    <meta name="viewport" content="width=device-width, initial-scale=1.0">
    <link rel="stylesheet" href="https://cdnjs.cloudflare.com/ajax/libs/skeleton/2.0.4/skeleton.min.css">
    <title> LetsChat - Manchester </title>
</head>
As you can see we have added the link tag which will import the framework from the link which it is hosted on.
Now if you go back to your browser you can already see the changes!

Adding our own CSS
We probably want to use some of our own CSS as well so for this we are going to use a custom CSS stylesheet.
For this we just need to make a few changes:
Create a CSS file.

Add a rule to that CSS file.
styles.css
.title {
    text-align: center
}
Add a class which will use the rule that we made.
index.html
<header>
    <h1 class="title"> LetsChat - Manchester </h1>
</header>
You should now see that in your browser that the text is aligned in the center.
Creating a form
Let's add a form to our page so the user can input some text!
index.html
<form>
    <label for="name">Name</label>
    <input type="text" id="name" name="name" />
    <label for="content">Chat</label>
    <textarea type="text" id="content" name="content"></textarea>
    <button>Send your Chat!</button>
</form>
If you check your browser it doesn't look great! Let's add some CSS from Skeleton CSS to make it look better!
index.html
<form>
    <label for="name">Name</label>
    <input class="u-full-width" type="text" id="name" name="name" />
    <label for="content">Chat</label>
    <textarea class="u-full-width" type="text" id="content" name="content"></textarea>
     <button class="button-primary">Send your Chat!</button>
</form>
Better but not quite there! Let's add a custom class to the form!
index.html
<form class="chat-form">
    <label for="name">Name</label>
And now the CSS
styles.css
.chat-form {
  width: 50%;
  margin: 0 auto;
}
Adding JavaScript
Let's add some basic JavaScript so that we can find out when a user clicks the send button!
First create a client.js file.
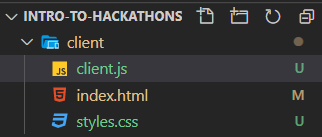
Then we are going to add the code to select the button and log out when it is clicked.
client.js
const form = document.querySelector('form');

form.addEventListener('submit', (event) => {
    event.preventDefault();
    console.log("Button was clicked");
});
Let's break down what we just added!
const form = document.querySelector('form');
The first thing that we needed to do was be able to identify what we wanted to manipulate or monitor. For this we can use querySelector and then select the <form> which we have.
form.addEventListener('submit', (event) => {});
We then need to detect when the button in the form is clicked. Luckily for us an event is triggered when the button is clicked known as the 'submit'event. Therefore, anything that we put in the arrow function will be called when we click the button.
event.preventDefault();
By default, when a form is submitted it will try and submit the data inside the form which will refresh the page. We don't want that to happen as we will be dealing with the data ourselves, so we have to prevent the behaviour.
Getting the submitted data
Okay so now we can detect when the user wants to send a chat. But we haven't got the data that they are submitting, and they don't know if it's been submitted. Let's change that.
Lets add some code to grab the data from the form.
client.js
form.addEventListener('submit', (event) => {
    event.preventDefault();
    const formData = new FormData(form);

    const name = formData.get('name');
    const content = formData.get('content');

    const chat = {
        name,
        content
    }

    console.log(chat);
    form.reset();
});
const formData = new FormData(form);
Form data is a class that is built into JavaScript. It allows you to access the data that a form contains. You have to let it know which form we are selecting so you need to pass in the form variable that we created earlier.
const name = formData.get('name');
We then use the formData object that we just created to select the name property from the input that we created in the html (type="text" id="name" name="name" />). We then do the same for the content.
const chat = {
        name,
        content
    }
console.log(chat);
Using the data that we just grabbed from the form we then create an object and log it out. Check your browser and you should see something like this in the log when you submit some data:

form.reset();
So that the user knows that they have submitted their data we are going to reset the form which can be done very easily with the built-in reset function.
Great, we now have a form the user send data through!
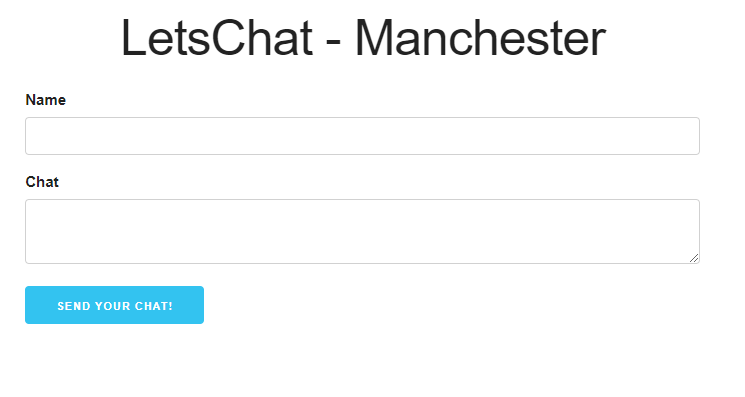
What we've covered
- We imported a CSS framework and used it
- We created an HTML form.
- We connected the form to JavaScript.
Let's set up a server to receive the data.
What you'll learn
- How to initialise an NPM package.json.
- How to use NPM to install a package
- How to set up express
- How to create two routes (get and post)
- How to set up responses for each route.
Package.json
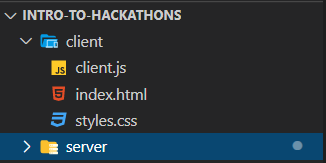
The first thing we need to do is set up a Node.js Package.json. Let's create a new server folder and then in the server folder run the following command.
Intro-to-hackathons\server> npm init
This utility will walk you through creating a package.json file.
You will see lots of text and it will ask you many questions. You can leave all of them as default or experiment with the if you want to. This will then create a package.json file. This will hold all the information about the packages that you have installed and some general information about the project itself.
Now that we have our package.json created we can start installing some NPM packages to help us create our backend server.
Installing Express and Morgan.
Okay so we are now going to install both Express and Morgan. Express is a web framework which we can use to easily set up the infrastructure for our server. This includes things like routing and handling different types of requests, we will cover both of these topics later. Morgan is more simple. We are just going to use it to log all the requests that the server gets to the console, so we can more easily see what is happening!
We can install them both with a single line:
Intro-to-hackathons\server> npm install express morgan
You should now see a new folder in your server directory called node_modules this is where all of your packages will be placed.
Setting up the server
To set up the server we need to first create an index.js file which is the first file that will be run when we start the server. Your full directory structure should look something like this:
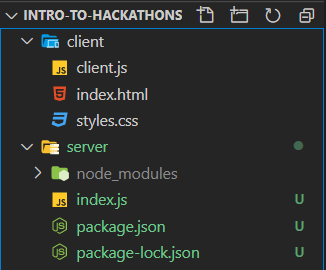
Okay lets write some code!
index.js
const express = require('express');

const app = express();

app.listen(5000, () => {
    console.log('Listening on http://localhost:5000');
});
const express = require('express');
We need to import the express package that we just installed so that we can use it in code, this is the convention for making imports in Node.js.
const app = express();
We then need to create an app using express.
app.listen(5000, () => {
    console.log('Listening on http://localhost:5000');
});
We then need to tell the app which port to listen on, port are a topic that we are not going to cover in this code lab but you can think of computers as having lots of open connections, and we are telling the application which on to connect to. In this case we are telling it to connect to port 5000. Once we are connected we then run the arrow function to log out that the server is running.
To be able to run the server we need to define what NPM is going to do to start it. We do this in the package.json. We are going to define the start script like this.
package.json
"scripts": {
    "test": "echo \"Error: no test specified\" && exit 1",
    "start": "node index.js"
  },
All this does is tell npm when we run npm run start then actually run node index.js which is the command for node to run the index.js file. You will see why we use this script instead of just running the command ourselves later.
We now have a server running on port 5000! You can navigate to http://localhost:5000 to view server.
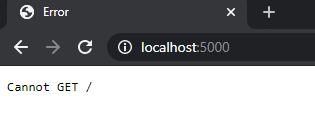
This doesn't look right though surely we should see something! We haven't created any routes for the server so it doesn't know what to send us when we view the page. We will explain what routes are in the next section!
Creating routes
What is routing
First lets explain a little about requests that are sent over http. A HTTP request is a message sent to the server from the client asking the server to perform a certain action. These actions could be various things from returning a piece of data to updating a database. When you visit a webpage your browser makes a http (GET) request to the server asking for the HTML of the webpage. There are many types of HTTP requests, we have just mentioned the most common one, the GET request. You make this request when you want some data from the server, that could be a webpage or a piece of data from a database. Some other common requests are POST (Add data to a database), PUT (Update something in the database), DELETE (Remove something from the database).
When you send a HTTP request you send it to a given address and this is where routing comes in. Whenever you use a different address from the same website, for example adding a /about to the end of the URL you are making a request to a different route (you are sending a get request asking for the about page).
We need to set up routing so that users of our API can make different requests to different URLs.
A simple get route
Its very simple to add a basic route. In the code after you have declared the app but before it starts listening, add this.
index.js
app.get('/', (request, response) => {
    response.json({
        message: 'Manchester'
    });
});
This code is quite hard to explain but the app.get( path, callback)takes the relative path for the route you are building, in this case the path becomes http://localhost:5000/. It also calls an anonymous function which takes the request and response as parameters. The request is the data given in the request and the response is the data that you will return. With these parameters it creates a route for the get request. The response.json( object )takes an object and converts it to JSON then sets the response to its value. So all in all when we make a request it will return the object contained within the JSON.
Let's check what happens when we restart the server!
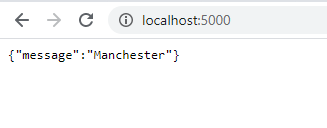
Great! We have a basic route setup to get some data from the server. But how do we send data to the server?
A simple post route
To be able to send some data to be added to the database we need a post route, let's add one.
index.js
app.post('/message', (request, response) => {
    console.log(request.body);
})
This is very similar to the route that we created previously. We have now created a post route with the address http://localhost:5000/message. When it receives a request it will log to the console the body of that request.
We haven't got any data to send to this route yet, so we will wait until the next section to test it.
What we've covered
- Initialising the NPM package.json.
- Using NPM to install a package
- Setting up express
- Creating two routes (get and post)
- Setting up responses for each route.
Now lets link the front and backends so that they can communicate.
What you'll learn
- Using the fetch function
- Creating a HTTP request
- Adding middleware to deal with CORS and JSON parsing
We need to be able to send a message to the server, and we need to be able to retrieve other messages from the server. For this we will need to link the front end and the backend servers.
Sending data to the server
To send data to the server we need to send a post request to the post route that we just set up. We will do this on the client side as the client is the one sending the request.
First of all lets tell the client where we want to get the data from. We defined this in the server as http://localhost:5000/message so we will create a variable to store that address at the start of our client.js file.
const API_URL = ‘http://localhost:5000/message';
Once we have a URL we can make a request to it using the in built fetch function. The function takes a string address and the request information to send like this. The request information includes the type of method, the body in JSON format (in this case the info the user submitted) and the content type which specifies a JSON.
client.js
fetch(API_URL, {
        method: 'POST',
        body: JSON.stringify(chat),
        headers: {
            'content-type': 'application/json'
        }
    })
You place this method inside the event listener arrow function at the end.
In theory we should now be able to start the server and the client and send data to the server. However, when we do we get something known as a CORS error.
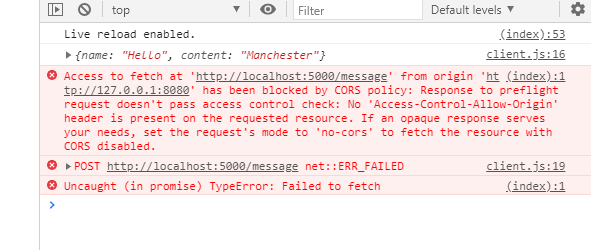
Generally CORS is used to protect a server by stopping anyone outside from making requests. However, in our case we want outside clients to be able to make requests. Let's fix this issue with a simple NPM package.
Dealing with CORS and JSON objects
First inside the server folder lets install the NPM cors module.
Intro-to-hackathons\server> npm install cors
npm WARN server@1.0.0 No repository field.

+ cors@2.8.5
added 2 packages from 2 contributors and audited 56 packages in 1.854s
found 0 vulnerabilities
Then we are going to edit the start of the server index.js file so that it looks like this.
index.js
const express = require('express');
const cors = require('cors');

const app = express();

app.use(cors());
const cors = require('cors');
We are importing the cors module that we have just installed.
app.use(cors());
We are then making the app use the module as a middleware. This will automatically deal with the CORS error by adding the ‘Access-control-allow-origin' header to all requests.
If we send another chat we no longer see the error but in our server console where we should see the body of the request we see this.
Listening on http://localhost:5000
undefined
This is because the server cannot automatically read the JSON object. We need to first parse the object with another piece of middleware.
This is an easy fix as the middleware is built into express. Just add the following line after the line using cors.
app.use(express.json());
If you restart the server and make submit a chat you should see something like this!
Listening on http://localhost:5000
{ name: 'Manchester', content: 'Hello!' }
What we've covered
- Using the fetch function
- Creating a HTTP request
- How to use the cors NPM package
- How to use the express json NPM package
What you'll learn
- How to set up and use Monk
- How to put data into and get data from the database
Setting up monk
Now we can receive data we need to save it somewhere. This is where our database is going to come in.
To connect to the MongoDB database that we have installed on our systems we are going to use a NPM package called monk.
Intro-to-hackathons\server> npm install monk
npm WARN server@1.0.0 No repository field.

+ monk@7.3.2
added 26 packages from 85
Then lets do the basic setup for monk, inside the index.js add these lines.
const monk = require('monk');
This imports the monk package
const db = monk('localhost/letschat');
This creates a link to the database letschat which is being hosted on our localhost version of MongoDB, if the database doesn't exist MongoDB will automatically create one.
const messages = db.get('messages');
This will create a collection called messages in the letschat database and assigns it to a variable db so that we can access it in code.
Insert the data
Now that we have monk installed we can use it to insert the data into the database. For this we will change the post route to grab the correct data from the request and transform it into an object which we will then insert.
Let's change the post route in the index.js file to look like this.
index.js
app.post('/message', (request, response) => {
    const message = {
        name: request.body.name.toString(),
        content: request.body.content.toString(),
        created: new Date()
    }

    messages.insert(message).then(createdMessage => {
        response.json(createdMessage);
    });
})
First, we construct an object called message with the attributes name and content being taken from the request. We also add a created attribute with a date created using the JavaScript built in Date() function.
const message = {
        name: request.body.name.toString(),
        content: request.body.content.toString(),
        created: new Date()
    }
Next we insert the data into the collection messages which will return a promise.
messages.insert(message)Finally we use the .next() method of the promise to create a response which contains the object which was inserted into the database
.then(createdMessage => {
        response.json(createdMessage);
});Checking it works on the client side
Lets check that the insert has worked on the client side. We have set up the response so the server will send back the inserted object when the request is successful. Lets check that it worked by logging out the response. To do this we are going to change our fetch function in the client.js to look like this.
client.js
fetch(API_URL, {
        method: 'POST',
        body: JSON.stringify(chat),
        headers: {
            'content-type': 'application/json'
        }
    }).then(response => response.json())
      .then(createdMessage => {
          console.log(createdMessage)
      })
All we have done is two .then() functions at the end of the fetch. The first .then() just converts the response into JSON format so that we can work with it a little easier.
.then(response => response.json())The second simply gets the JSONified message and logs it out to the console.
.then(createdMessage => {
          console.log(createdMessage)
      })
If we test it we get the data that was inserted into the database including the date we added and an ID for the object!

Getting data from the database
Now that we have inserted data into the database we need to be able to get it back out. Lets create a get route for this so the client can make a request to get all the data. In index.js we are going to add this route.
index.js
app.get('/message', (request, response) => {
    messages.find().then( messages => {
        response.json(messages);
    });
});
Most of this code you should be familiar with as we have written two routes before.
messages.find()This is the only new code which we have not used before. It is a function in monk that will return a promise with all the data in the MongoDB collection.
.then( messages => {
        response.json(messages);
    });
Using the promise we then convert the data we got from the database to JSON and return it in the response.
If we now restart our server and go to http://localhost:5000/message then we should see something like this.

We can format the data with a JSON formatting extension like this one: JSON Formatter for chrome
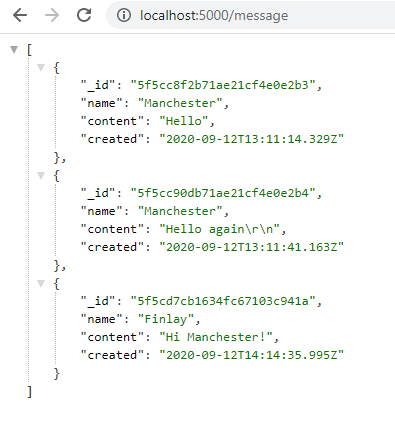
This should look familiar, it's all the messages that we have sent with an ID and a generated date! Now that we can get all the messages from the database we are going to work on displaying them on the page.
What we've covered
- How to set up and use Monk
- How to put data into and get data from the database
What you'll learn
- How to create a get request using the fetch function.
- Using bad-words to filter data before putting it into the database
- How to create HTML elements with JavaScript
Fetch the data from the server.
Now that we have the database setup, and we know that we can get all the data from it, lets work on displaying that data on the page. The first thing we are going to have to do is create a request on the client to get the data from the server. We are probably going to want to send this request at different points in the program (when the user refreshes, when they send a message) therefore we will wrap it in a function. Edit the client.js file and add this function at the bottom.
client.js
function listAllMessages() {
    fetch(API_URL, {
        method: 'GET',
    }).then(response => response.json())
      .then(messages => {
          console.log(messages)
      })
}
At this point you should understand what this is doing, its very similar to the previous fetch we wrote only this time we are using the get method, so we don't have to specify a body or any headers. Now add a call to this function at the top of the file.
client.js
const form = document.querySelector('form');
const API_URL = 'http://localhost:5000/message';

listAllMessages();
Now if you go back to your browser and refresh the page you should see something like this.
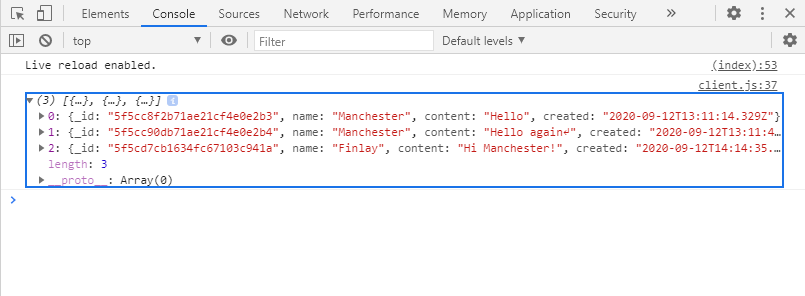
We now have the data inside the client and can work on displaying it.
Filter the data
Now that we are going to display the data to the client we don't want people to be able to send any inappropriate messages on our application, so we need to filter the messages which they can send. There are many NPM packages which you can use for this, we are going to use one called bad-words.
As usual lets install the package in the server folder
Intro-to-hackathons\server>npm install bad-words
npm WARN server@1.0.0 No repository field.

+ bad-words@3.0.3
added 2 packages from 2 contributors and audited 84 packages in 1.816s
found 0 vulnerabilities
Then we will import the module and use it. First, import it in the index.js file.
index.js
const Filter = require('bad-words');Then we will create an object for it.
index.js
const db = monk('localhost/letschat');
const messages = db.get('messages');
const filter = new Filter();
Then in the post route we will filter the words before we put them into the database.
index.js
app.post('/message', (request, response) => {
    const message = {
        name: filter.clean(request.body.name.toString()),
        content: filter.clean(request.body.content.toString()),
        created: new Date()
    }

    messages.insert(message).then(createdMessage => {
        response.json(createdMessage);
    });
});
Now if anyone sends any "bad words" then they will be filtered out. We don't have a way to display the data at the moment but as an example of what it will look like in the future here is an example!
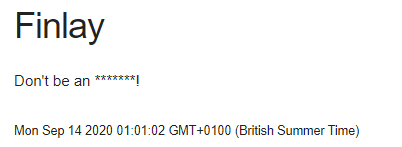
This is a makes the site a bit more appropriate for a wider audience!
Displaying the data
We first need a place to put the data, for this we are going to add an empty div at the end of our index.html file. We will give it a class of messages so that we can select it in our client.js file.
index.html
        <textarea class="u-full-width" type="text" id="content" name="content"></textarea>
        <button class="button-primary">Send your Chat!</button>
      </form>
      <div class="messages"></div>
    </main>
We will then select it at the start of the client.js file.
client.js
const form = document.querySelector('form');
const messagesDiv = document.querySelector('messages');
const API_URL = 'http://localhost:5000/message';
Then inside the list all messages function we are going to add the html to create a list of all previous messages. This is what your listAllMessages function should now look like.
client.js
function listAllMessages() {
    fetch(API_URL, {
        method: 'GET',
    }).then(response => response.json())
        .then(messages => {
            messageDiv.innerHTML = "";
            messages.forEach(message => {
                const div = document.createElement('div');

                const header = document.createElement('h3');
                header.textContent = message.name;

                const contents = document.createElement('p');
                contents.textContent = message.content;

                const date = document.createElement('small');
                date.textContent = new Date(message.created);

                div.appendChild(header);
                div.appendChild(contents);
                div.appendChild(date);

                messagesDiv.appendChild(div);
          })
      })
}
We are clearing the messagesDiv and then we are creating a div for each new message. Each div contains a heading with the name of the messenger, a paragraph with the contents of the message and a small which contains the date. We then add each div to the messagesDiv so that we create a list of messages on the page.
Lets take a look at what we have just done.
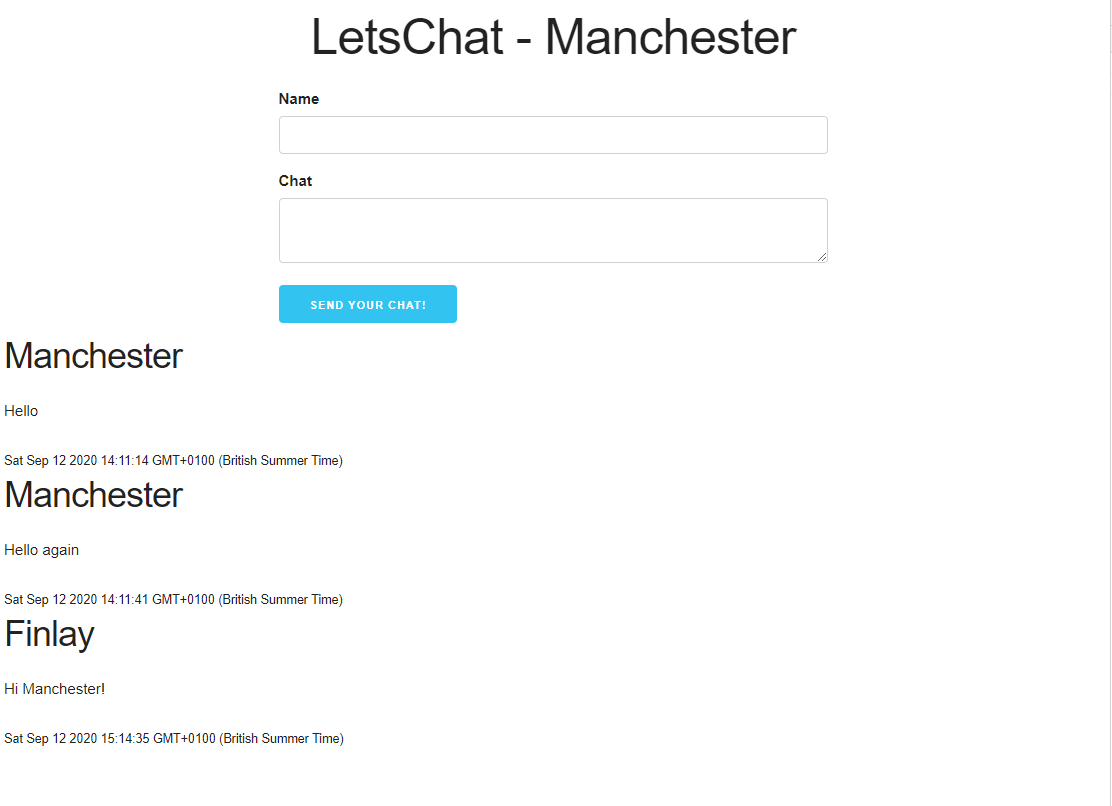
Okay great, we have displayed the data! However, it's not looking that great at the moment, lets fix that.
Improving the display
Let's improve the user experience and the display. The first easy thing we can do is make the list of elements refresh when the user sends a message. This makes the experience feel more responsive.
To do this we just call the listAllMessages function in the submit eventListener. We do this at the end of the fetch function so that the message that was just sent is also displayed.
client.js
   }).then(response => response.json())
      .then(createdMessage => {
          console.log(createdMessage)
          listAllMessages();
      })
});
Let's also add some very basic CSS to our styles.css file to centre the messages.
styles.css
.messages {
  width: 80%;
  margin: 0 auto;
}
You may have also noticed that our messages are in the order of oldest to newest. Lets change that so that the most recent messages are displayed first. In the listAllMessages function we can add another .then to reverse the list, so they are in most recent order.
client.js
function listAllMessages() {
    fetch(API_URL, {
        method: 'GET',
    }).then(response => response.json())
        .then(messages => messages.reverse())
        .then(messages => {
            messagesDiv.innerHtml = '';
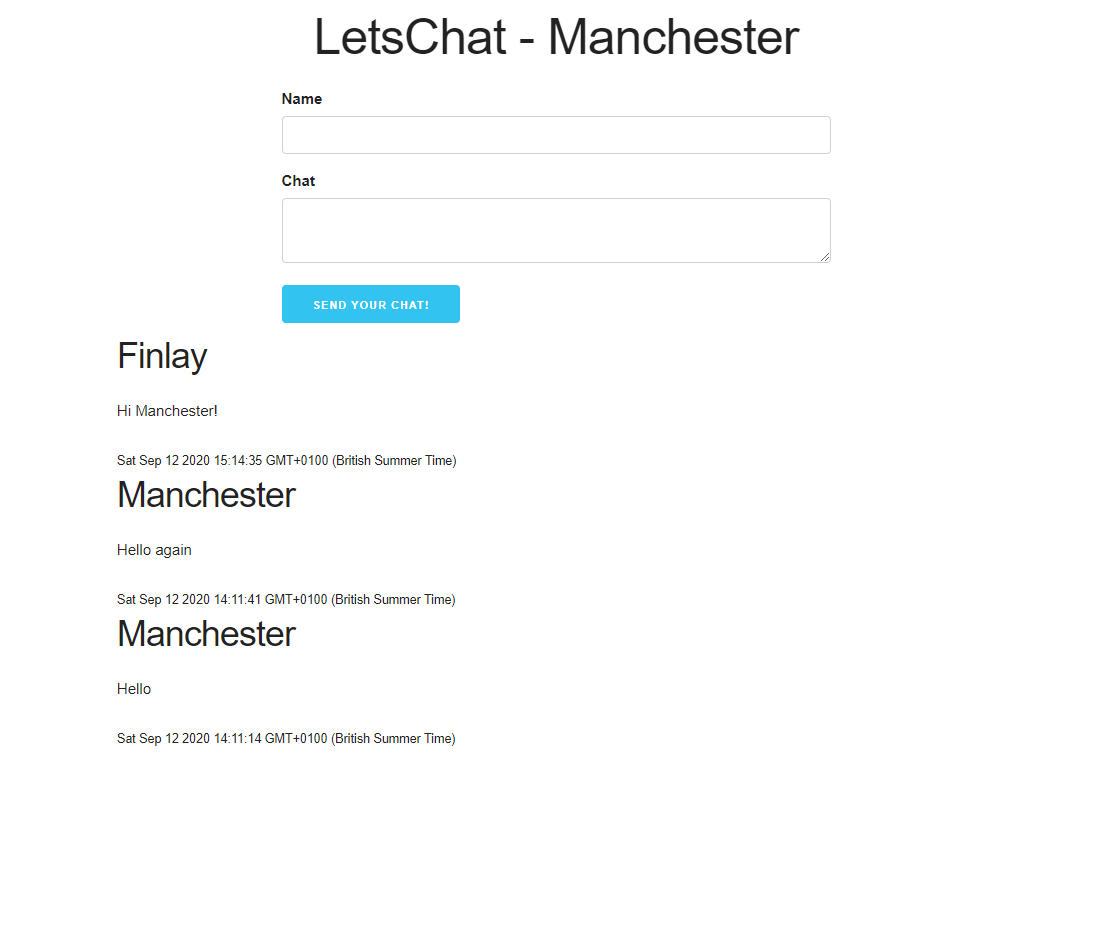
Our page should now look something like this.
What we've covered
- How to create a get request using the fetch function.
- How to create HTML elements with JavaScript
We are now done with the building the app, and we can now work on deploying it!
What you'll learn
- How to use environment variables
- How to set up and link MongoDB Atlas
- How to host the client and server on Heroku
Environment variables
When we host on an external server we don't want to keep the login details for our database in the code as when we push to GitHub we would also upload our credentials. To solve this problem we use something called environment variables. These are variables stored in the environment rather than in the code which your program can access while running.
In this case we are going to change the address of the database to an environment variable.
index.js
const db = monk(process.env.MONGO_URI || 'localhost/letschat');
const messages = db.get('messages');
In this case the process.env.MONGO_URI is the MONGO_URI environment variable. If this variable doesn't exist (we are running it on our local machine) then it will instead connect to the local host which is done with the || operator.
When we deploy to Heroku we are not going to be able to decide which port to use as Heroku decides this for us. Therefore, inside Heroku it will automatically assign our program a port which we can access through environment variables.
To make sure this works in our app we are going to edit the index.js with a couple of lines at the end.
index.js
const PORT = process.env.PORT || 5000;
app.listen(PORT, () => {
    console.log('Listening on ${ PORT }');
})
This is similar to the first environment variable example in that if the variable exists it will use it and if not it will use port 5000 as a default.
Create a MongoDB Atlas cluster
First lets sign up for MongoDB Atlas here. You should see this screen.
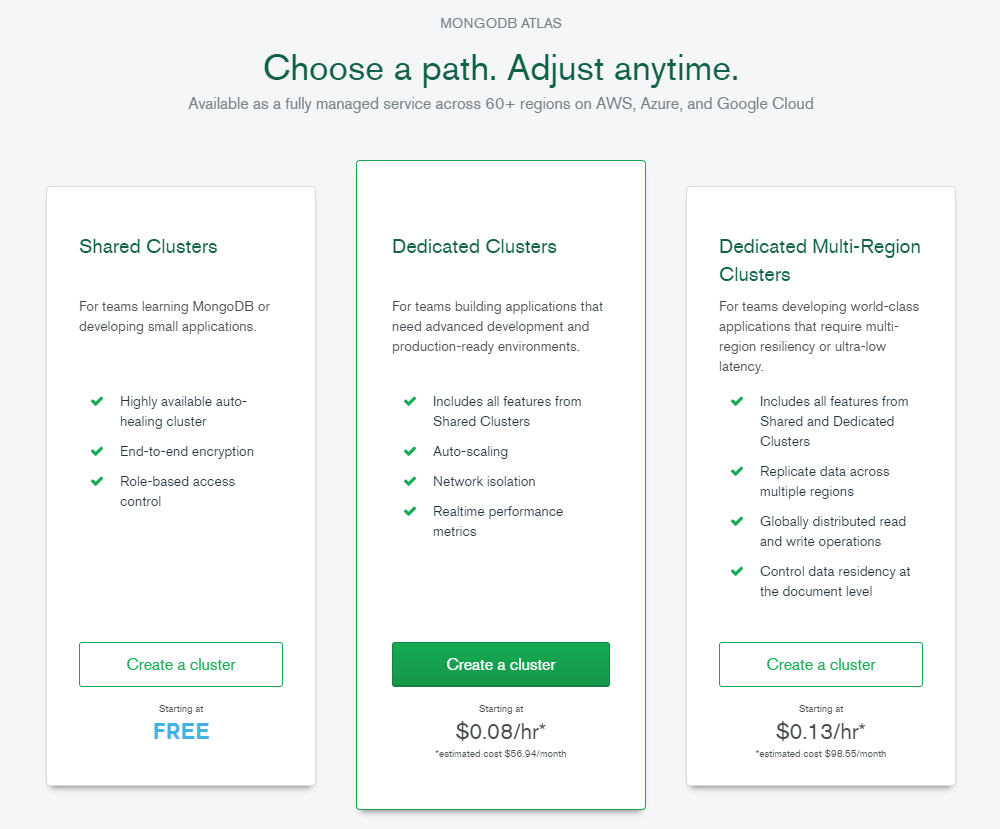
We are only creating a basic application so the free tier is enough for us. You can leave all the options as their defaults, but we have decided to change the name of our cluster to DSCManchester.
You should now be greeted by something like this.
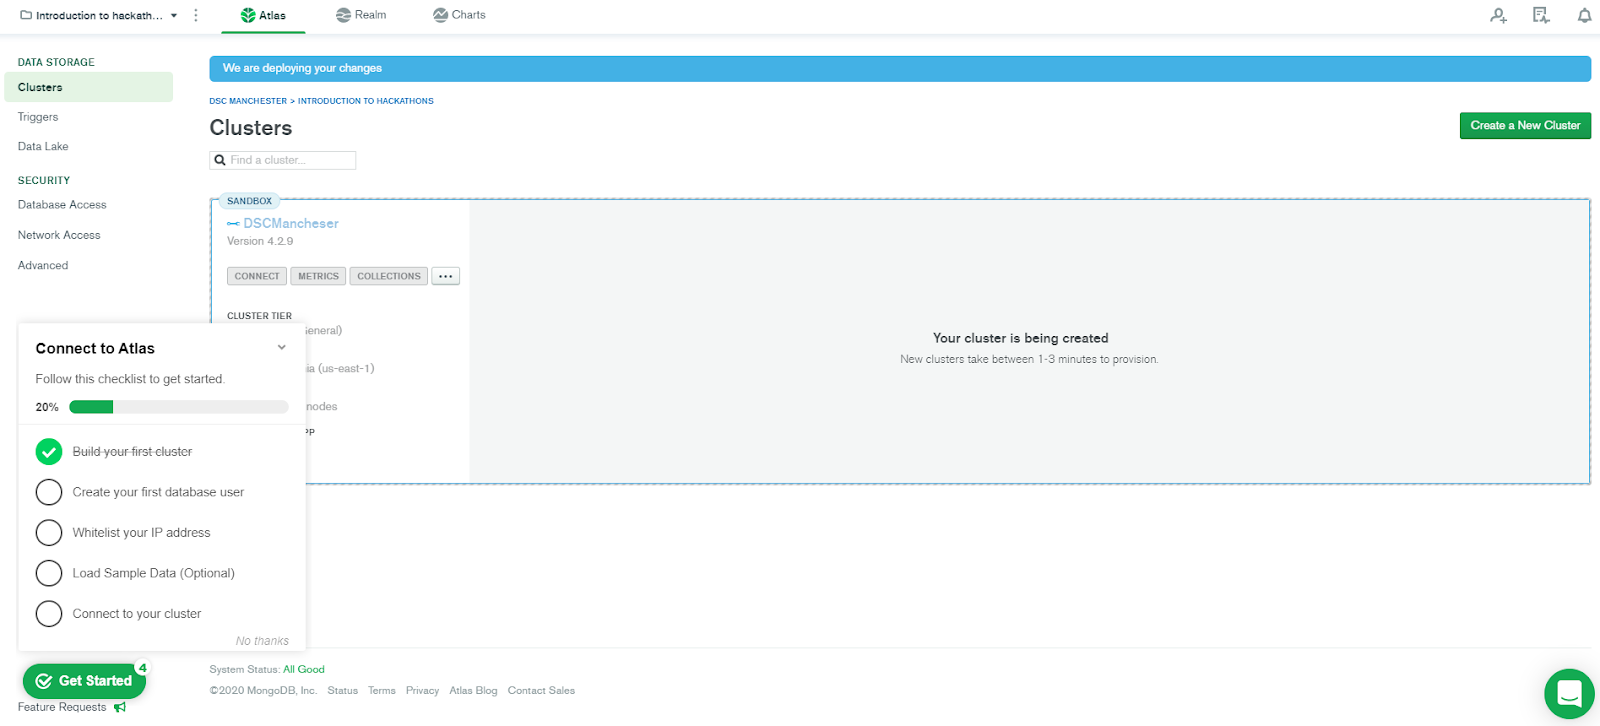
We are going to follow most of the recommended steps. First lets create a user by clicking on the database access tab and clicking Add New Database User. You should see this screen.
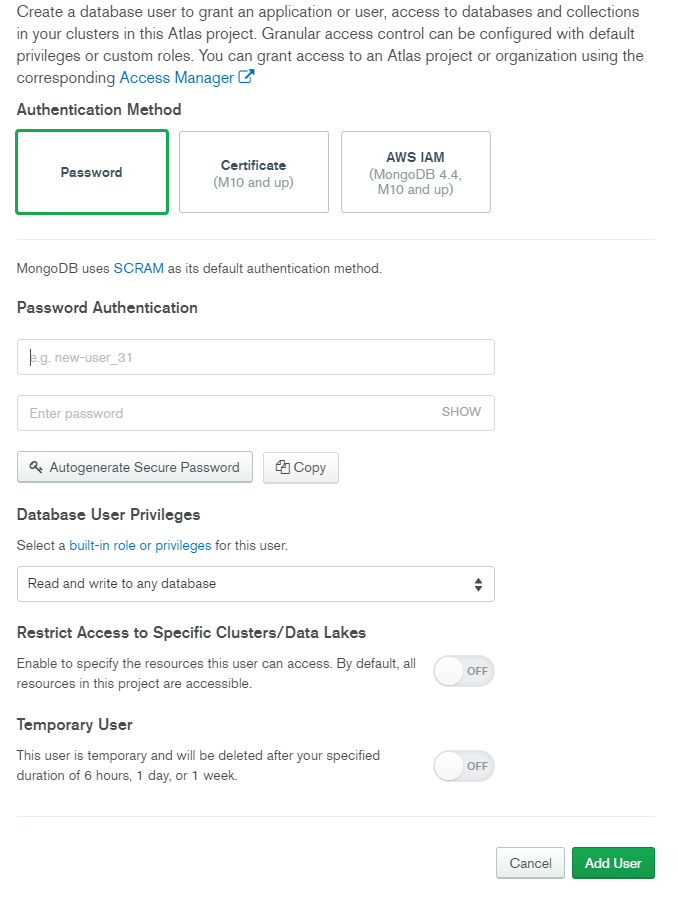
We are going to use the password authentication method as it's the simplest to set up. Create a user with a username and password that you can remember and keep a note of them as we will need them later on. All the other options can be left as defaults.
Now we need to whitelist an IP address to allow it to connect to the server. We are going to allow any IP Address to connect to our database for simplicity. In a real production application you should never do this as it is unsecure. Go to the network access tab and click Add IP Address, you should see this.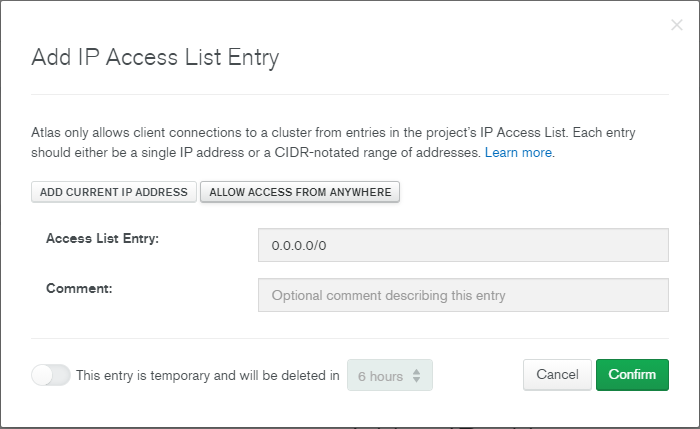
Click allow access from anywhere and confirm. The server will make the changes, and we now have an accessible hosted database!
To access the database we will need a URL for it. If you go back to the clusters tab and click connect on your cluster then you will get some options on how to connect. Click Connect your application and you will see something like this.
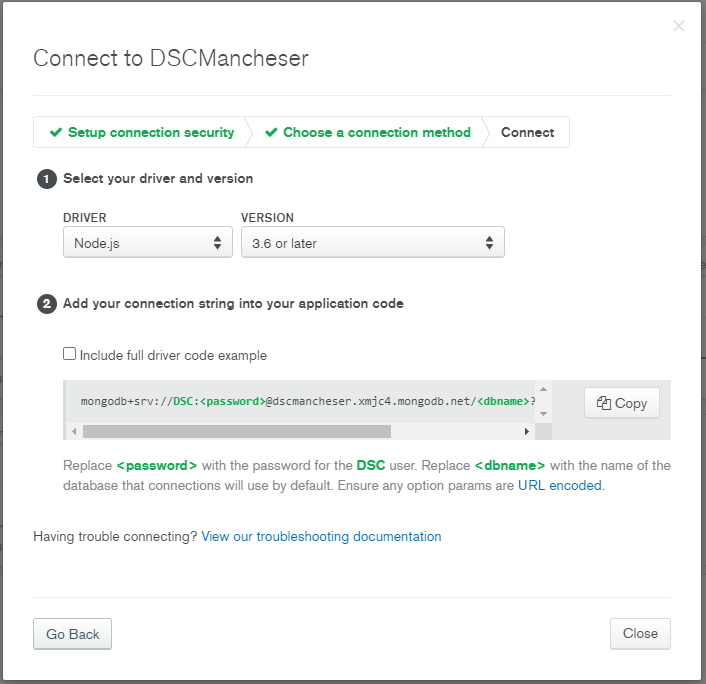
Copy this connection string as we are going to need it when we host the server.
Hosting the server with Heroku
We are going to deploy our server and our client as separate Heroku apps. To do this you need to install git and the Heroku CLI. You will also need to create an account on Heroku.
Now go into your server folder and run heroku login and follow the instructions to log into your account.
You then need to initialise the server folder as a git repository and commit all the files into that repository.
Intro-to-hackathons\server>git init
Intro-to-hackathons\server>git add .
Intro-to-hackathons\server>git commit -m "Deploying the server"
You now have all your changes staged, we need to create a Heroku app to push to.
Intro-to-hackathons\server>heroku create
Creating app... done, ⬢ gentle-shore-15785
https://gentle-shore-15785.herokuapp.com/ | https://git.heroku.com/gentle-shore-15785.git
You should see something like this when running heroku create but it will have a random name so yours wont be exactly the same. We now need to add our environment variable to Heroku so that we can connect to our MongoDB database. Remember to get the link for your own database and change the password fields.
Intro-to-hackathons\server>heroku config:set MONGO_URI=mongodb+srv://DSC:<password>@dscmancheser.xmjc4.mongodb.net/messages?retryWrites=true&w=majority
Next we want to push our code to this new Heroku repository.
Intro-to-hackathons\server>git push heroku master
....
remote:        https://gentle-shore-15785.herokuapp.com/ deployed to Heroku
remote:
remote: Verifying deploy... done.
To https://git.heroku.com/gentle-shore-15785.git
 * [new branch]      master -> master
Hopefully you should see something like this in the console. Go to the address given and make sure that when you view the page you see this:
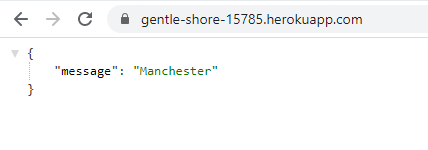
Your server is now being hosted on the internet!
Hosting the client with Heroku
Now that we have hosted the server we can connect the client to the server instead of the locally hosted version when its in deployment. Let's edit the declaration of the API_URL in client.js to reflect this.
client.js
const API_URL = window.location.hostname === 'localhost' ? 'http://localhost:5000/message' : 'https://gentle-shore-15785.herokuapp.com/message';We have used a ternary operator to detect if we are hosting the client on localhost, if we are then we use a local server, if not then we should use our hosted server. Bear in mind that we are using the link for our server, you should be using the one that you just created.
Due to hosting the client as a separate application Heroku need to know how to serve the file that we have given it. To do this we are going to use a quick workaround in php to serve it as a php application without making any changes to code.
First inside the client folder create a composer.json file. All you need to put inside it are {}.
Then add an index.php file and add the below line.
index.php
<?php include_once("index.html"); ?>
Once that is done your folder structure should look something like this.
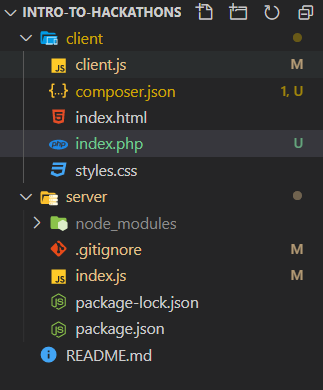
We are now ready to host the client on heroku as well so lets use the same steps as before.
Intro-to-hackathons\client>git add .
Intro-to-hackathons\client>git commit -m "Deploying the client"
Intro-to-hackathons\client>git push heroku master
....
remote:        Released v5
remote:        https://pure-atoll-90569.herokuapp.com/ deployed to Heroku
remote:
remote: Verifying deploy... done.
To https://git.heroku.com/pure-atoll-90569.git
   fce6c24..9112e88  master -> master
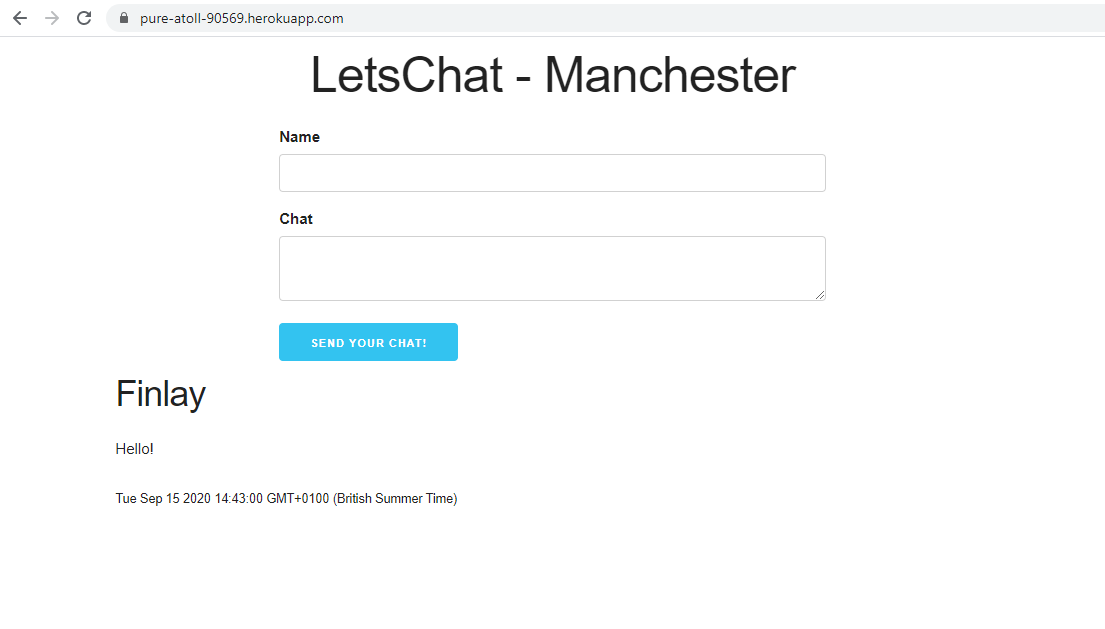
Now if you go to the address then you should have a fully hosted app that anyone can connect to.
What we've covered
- How to use environment variables
- How to set up and link MongoDB Atlas
- How to host the client and server on Heroku
Congratulations, you've successfully built a full webapp!
You created a client to display data to the user and allow them to submit data and built a API server to interact with a database to store submitted data. You learned how to use npm packages, promises and host it all using Heroku.
You now know most of the core knowledge for building a basic webapp.
What's next?
Check out some of these codelabs...